本文概览:包括两个部分:(1)通过IDEA导入tomcat源码,并执行tomcat;(2)对tomcat源码进行build,打包成二进制的tar.gz。
1 运行Tomcat源码
1.1 IEDA导入源码
1、下载源码 apache-tomcat-8.5.24-src.tar.gz
(1)下载地址
https://tomcat.apache.org/download-80.cgi#8.0.48
(2)选择如下“Source Code Distributions”下面的tar.gz文件
注意:这里不使用“zip”,zip在mac或者linux下面的时候bin/目录下面的脚本可能存在乱码。

2、解压文件apache-tomcat-8.5.24-src.tar.gz,新建一个pom.xml文件。
- maven-compiler-plugin配置的jdk为1.8
|
1 2 3 4 5 6 7 8 9 10 11 12 13 14 15 16 17 18 19 20 21 22 23 24 25 26 27 28 29 30 31 32 33 34 35 36 37 38 39 40 41 42 43 44 45 46 47 48 49 50 51 52 53 54 55 56 57 58 59 60 61 62 63 64 65 66 67 68 69 70 71 72 73 |
<?xml version="1.0" encoding="UTF-8"?> <project xmlns="http://maven.apache.org/POM/4.0.0" xmlns:xsi="http://www.w3.org/2001/XMLSchema-instance" xsi:schemaLocation="http://maven.apache.org/POM/4.0.0 http://maven.apache.org/xsd/maven-4.0.0.xsd"> <modelVersion>4.0.0</modelVersion> <groupId>org.apache.tomcat</groupId> <artifactId>tomcat8</artifactId> <name>tomcat8</name> <version>8.0</version> <build> <finalName>tomcat8</finalName> <sourceDirectory>java</sourceDirectory> <testSourceDirectory>test</testSourceDirectory> <resources> <resource> <directory>java</directory> </resource> </resources> <testResources> <testResource> <directory>test</directory> </testResource> </testResources> <plugins> <plugin> <groupId>org.apache.maven.plugins</groupId> <artifactId>maven-compiler-plugin</artifactId> <version>3.5.1</version> <configuration> <encoding>UTF-8</encoding> <source>1.8</source> <target>1.8</target> </configuration> </plugin> </plugins> </build> <dependencies> <dependency> <groupId>junit</groupId> <artifactId>junit</artifactId> <version>4.12</version> <scope>test</scope> </dependency> <dependency> <groupId>ant</groupId> <artifactId>ant</artifactId> <version>1.7.0</version> </dependency> <dependency> <groupId>wsdl4j</groupId> <artifactId>wsdl4j</artifactId> <version>1.6.2</version> </dependency> <dependency> <groupId>javax.xml</groupId> <artifactId>jaxrpc</artifactId> <version>1.1</version> </dependency> <dependency> <groupId>org.eclipse.jdt.core.compiler</groupId> <artifactId>ecj</artifactId> <version>4.5.1</version> </dependency> <dependency> <groupId>org.easymock</groupId> <artifactId>easymock</artifactId> <version>3.4</version> <scope>test</scope> </dependency> </dependencies> </project> |
3、执行maven命令,必须添加 “-Dmaven.test.skip=true”的参数 mvn clean package -Dmaven.test.skip=true
4、上面的源码的工程已上传到github,也可以直接从github上下载
地址:https://github.com/zhonghuwu/tomcatlearn
1.2 下载二进制tomcat
在运行源码时,还需要配置vm参数“-Dcatalina.home”来指定tomcat二进制包解压后的路径,否自就会执行http://127.0.0.1:8080/,就会报错,如下图错误信息。所以还需要下载二进制的tomcat。

1、下载
版本号必须得和源码版本号一样,所以这里也选择8.5.24版本
(1)下载地址
https://tomcat.apache.org/download-80.cgi#8.0.48
(2)下载“Binary Distributions”中的tar.gz包

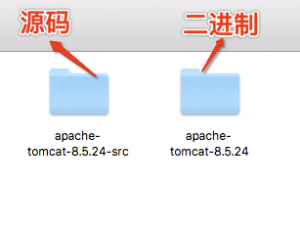
2、解压,和源码放置在同一个目录下面,如下

1.3 运行源码
1、配置运行参数
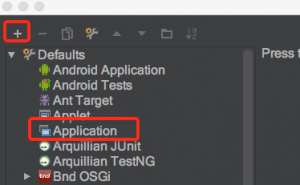
(1)点击“Edit Configurations”,然后添加Application,如下图

(2)设置运行参数

配置的值为:
(1)MainClass,设置tomcat启动类
|
1 |
org.apache.catalina.startup.Bootstrap |
(2)Vm options,设置为tomcat二进制的目录路径
|
1 |
-Dcatalina.home=/Users/wuzhonghu/Project/mycode/sourcecode/apache-tomcat-8.5.24 |
(3)Working directory,设置为tomcat源码的路径
|
1 |
/Users/wuzhonghu/Project/mycode/sourcecode/apache-tomcat-8.0.48-src |
(4)JRE,设置JDK为1.8。tomcat8.x必须是JDK1.8.
2、执行run发现“TestCookierFilter找不到符号CookierFilter”,解决方法是:注释掉TestCookierFilter类中所有方法。
3、再次执行 run,查看 http://127.0.0.1:8080/,出现了熟悉的页面

2 Build Tomcat源码
当我们修改源码完成,还需要把tomcat 源码打包成二进制包。
1、部署Ant
(1)下载
(2)配置环境变量
编辑文件sudo vi /etc/profile ,添加如下内容
|
1 2 3 |
export ANT_HOME=/Users/wuzhonghu/local/apache-ant-1.10.1 export PATH=:$PATH:$ANT_HOME/bin:/usr/bin/ |
加载最新配置
|
1 |
source /etc/profile |
(3)执行
|
1 2 |
$ ant -version Apache Ant(TM) version 1.10.1 compiled on February 2 2017 |
2、删除{tomcat.source}目录下面与mavn工程有关信息
因为源码是使用Idea,通过mavn来管理的,所以删除IDEA和mavn相关信息:
- *.impl文件
- pom.xml文件
- target目录
3、在{tomcat.source}目录下,创建build.properites 文件
将build.properties.default 内容复制一份到build.properties,然后修改base.path的值为
|
1 |
base.path=/Users/wuzhonghu/Project/apache-tomcat-8.5.24-src/tomcat-build-libs3.在{tomcat.source}目录下,执行ant |
4、在{tomcat.source}目录下,执行ant
|
1 2 3 4 5 |
# 进入到源码路径 cd ${tomcat.source} # 执行ant ant |
(1)出现问题
validate:
[checkstyle] Running Checkstyle 6.17 on 3211 files
[checkstyle] [ERROR] /Users/wuzhonghu/Project/apache-tomcat-8.5.24-src/tomcat-build-libs/commons-daemon-1.1.0/LICENSE.txt:2: 当前行与被期待的 header: ‘^(rem)?\W*Licensed to the Apache Software Foundation \(ASF\) under one or more$’ 不符。 [RegexpHeader]
(2)解决问题
将build.xml中相关的checkstyle配置删除掉。如下:
- 删除阶段<target name=”validate” if=”${execute.validate}”…> </target>,这个节点包含了checkstyle的配置
- 删除使用如下节点中 validate,因为这个节点用到了validate
|
1 |
<target name="compile" depends="download-compile,validate"> ... </target> |
删除validate之后为
|
1 |
<target name="compile" depends="download-compile"> ... </target> |
5、继续执行ant
(1)错误信息
destination directory “/Users/wuzhonghu/Project/apache-tomcat-8.5.24-src/output/classes” does not exist or is not a directory
(2)解决问题
手动在{$tomcat.source}目录下面创建一个 output/classes目录。
6、执行成功,则在${tomcat.source}/output/build目录下面会有如下内容
|
1 2 |
$ ls output/build/ bin conf lib logs temp webapps |
这个目录就是我们解压二进制tomcat的tar包或者zip包得到文件,可以直接执行 sh bin/startup.sh来启动tomcat。
(1)如果执行sh bin/startpu.sh,可能会出现如下错误:
|
1 2 3 4 5 6 |
$ sh bin/startup.sh : command not founde 2: : command not founde 17: : command not founde 21: 'in/startup.sh: line 24: syntax error near unexpected token `in 'in/startup.sh: line 24: `case "`uname`" in |
这个错误原因是文件编码的原因,一个解决问题方法就是:使用下载的tomcat二进制文件中bin目录下的脚本覆盖当前bin目录下的所有脚本。
7、通过tar或者zip生成相应的压缩包。在build目录下面执行 tar -cvf tomcat.tar.gz *此时就生成tar.gz包啦。
3 参考
1、官网 build tomcat :http://参考:https://tomcat.apache.org/tomcat-8.5-doc/building.html
附:其他调试tomcat方法
因为Spring boot集成了Tomcat,所以可以通过搭建一个Spring boot项目,来调试tomcat处理一个请求的过程。搭建Spring boot项目,可以参考:
(全文完)


