本文概览:介绍了xml和properties两种文件
1 xml文件
1.1 @Configuration介绍
Spring boot一个目的就是消除xml文件,之前在spring中使用xml配置<bean>。现在可以使用@Configuration对应一个xml文件,如下一个spring的xml文件:
|
1 2 3 4 5 6 7 8 9 10 11 12 13 |
<?xml version="1.0" encoding="UTF-8"?> <beans xmlns:xsi="http://www.w3.org/2001/XMLSchema-instance" xmlns:context="http://www.springframework.org/schema/context" xmlns="http://www.springframework.org/schema/beans" xmlns:aop="http://www.springframework.org/schema/aop" xsi:schemaLocation="http://www.springframework.org/schema/beans http://www.springframework.org/schema/beans/spring-beans-3.0.xsd http://www.springframework.org/schema/context http://www.springframework.org/schema/context/spring-context.xsd http://www.springframework.org/schema/aop http://www.springframework.org/schema/aop/spring-aop.xsd"> </beans> |
在xml中还有一些<bean>等属性节点,对于@Configuration,这些属性也有对应的注解,如下:
1.1.1 @Bean
代替<bean>节点,也具有name、init、destryMethod属性。如果依赖外部类,如在xml中
|
1 2 3 |
<bean id="student" class="Com.Student"> <constructor-arg ref="home" /> </bean> |
在使用@Configuration时可以通过如下,其中@Qualifier指定加载的bean的name。
|
1 2 3 4 5 6 7 |
@Configuration public class FirstXml { @Bean(name = "student") public Student getStudent(@Qualifier("home") Home home){ return new Student(home); } } |
1.1.2 @Scope
@Scope代替<bean>中scope的属性
1.1.3 @ComponentScan
代替<context:component-scan base-package=”com.service” />
|
1 2 3 4 5 |
@Configuration @ComponentScan(basePackages = {"config.biz", "config.service"}) public class FirstXml { } |
1.1.4 @ImportResource 和 @Import
1、@ImportResource
为了在spring boot引入spring xml,实现<import resource=”..” />
2、@Import
为了导入使用了@Configuration的类,用于整合@Configuration标记的配置类,类似在xml中通过<import resource=”..” />引入其他的bean的xml文件。
|
1 2 3 4 5 6 |
@Configuration @Import(value = SecondXml.class) @ImportResource(value = "classpath:/applicationContext.xml") public class FirstXml { .... } |
3、@Import 和 @ImprtResource
@Import引入是配置类(.class文件);@ImportResource引入的是xml文件。
1.2 实例
如下
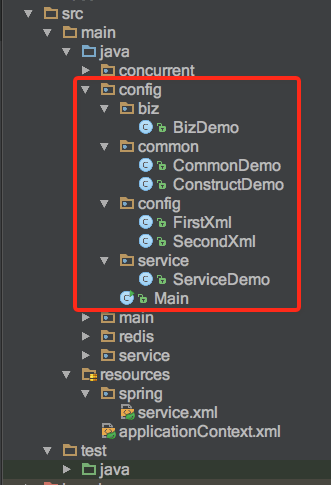
1、具有注解@Servcie的类
(1)BizDemo
|
1 2 3 4 5 6 |
@Service public class BizDemo { public void name(){ System.out.printf("BizDemo"); } } |
(2)ServcieDemo
|
1 2 3 4 5 6 |
@Service public class ServiceDemo { public void name() { System.out.printf("ServiceDemo"); } } |
2、没有使用@Service,通过类似<bean>在xml方式定义对象
(1)CommonDemo,默认构造函数
|
1 2 3 4 5 6 7 8 9 10 11 12 13 |
public class CommonDemo { public void name() { System.out.println("name:CommonDemo"); } public void init() { System.out.println("init CommonDemo"); } public void destroy() { System.out.println("destroy"); } } |
(2)ConstructDemo,有构造函数
|
1 2 3 4 5 6 7 8 9 10 11 12 13 |
public class ConstructDemo { private CommonDemo commonDemo; public ConstructDemo(CommonDemo commonDemo) { this.commonDemo = commonDemo; } public void name() { System.out.println("use:CommonDemo"); commonDemo.name(); } } |
3、xml文件
假设有两个配置文件类FirstXml和SecondXml。
(1)FirstXml
|
1 2 3 4 5 6 7 8 9 10 11 12 13 14 15 16 17 18 19 20 |
@Configuration @ComponentScan(basePackages = {"config.biz", "config.service"}) @Import(value = SecondXml.class) @ImportResource(value = "classpath:/applicationContext.xml") public class FirstXml { /** * 配置<bean id="commonDemo"> * @return */ @Bean(name = "commonDemo", initMethod = "init", destroyMethod = "destroy") public CommonDemo createCommonDemo() { return new CommonDemo(); } @Bean(name = "constructDemo") public ConstructDemo constructDemo(@Qualifier("commonDemo") CommonDemo commonDemo){ return new ConstructDemo(commonDemo); } } |
(2)Second.xml
|
1 2 3 |
@Configuration public class SecondXml { } |
4、执行main
|
1 2 3 4 5 6 7 8 9 10 11 12 |
public class Main { public static void main(String[] args){ ApplicationContext applicationContext = new AnnotationConfigApplicationContext(FirstXml.class); // 无构造函数 CommonDemo commonDemo = (CommonDemo) applicationContext.getBean("commonDemo"); commonDemo.name(); // 有构造函数 ConstructDemo constructDemo = (ConstructDemo) applicationContext.getBean("constructDemo"); constructDemo.name(); } } |
2 porperties属性文件
包括propertis中导入和获取两部分。
2.1 导入配置文件
2.1.1 @PropertySource
在xml中通过如下方式导入propertis
|
1 2 |
<!-- 加载properties文件 --> <context:property-placeholder location="classpath:config.properties"/> |
在使用@Configuration代替xml时,可以通过@PropertySource来导入
|
1 2 3 4 5 |
@Configuration @PropertySource(value = "classpath:/properties") public class FirstXml { ... } |
2.1.2 其他导入方式
2.1.2.1 命令行
通过“–parName=xxx”来指定属性key和value,如下
|
1 |
java -jar app.jar --appName.score=100 |
2.1.2.2 java命令
通过java命令的-D参数
-D<propertyName>=value
举例如:
|
1 |
java -DappName.score=100 -jar app.jar |
2.1.2.3 spring boot 默认配置文件
spring boot自带的属性文件:application.properties或application.yml。
2.1.2.4 apollo
还可以通过apollo来管理配置文件
2.2 获取属性值
在xml中可以通过”${xxx}”获取到properties中值。
|
1 2 3 4 5 6 |
<bean id="dataSource2" class="com.alibaba.druid.pool.DruidDataSource" init-method="init" destroy-method="close"> <property name="url" value="${jdbc.url}"/> <property name="username" value="${jdbc.user}"/> <property name="password" value="${jdbc.password}"/> .... </bean> |
在使用@Configuration代替xml时,可以通过@Value(“${xx}”) 和@ConfigurationProperties来获取配置文件中值。
2.2.1 @Value(“${xx}”)
使用举例如下
|
1 2 3 4 5 6 7 8 |
@Configuration @PropertySource(value = "classpath:/test.properties") public class FirstXml{ @Value("${db_jdbc_url}") private String keyValue ; } |
2.2.2 @ConfigurationProperties
|
1 |
这个属性必须引入spring boot的包才有。 |
1、定义@Bean上使用@ConfigurationProperties,如下
|
1 2 3 4 5 6 7 8 9 |
@Configuration @PropertySource(value = "classpath:/test.properties") public class FirstXml { @Bean("propertyDemo") @ConfigurationProperties(prefix = "appName") public PropertyDemo getPropertyDemo() { return new PropertyDemo(); } } |
PropertyDemo如下:
|
1 2 3 4 5 6 7 8 9 10 11 |
public class PropertyDemo { private String score; public String getScore() { return score; } public void setScore(String score) { this.score = score; } } |
test.properties中值为
|
1 |
appName.score=100 |
2、在测试时,必须启动spring boot才可以,不能通过如下main来启动,否则@ConfigurationProperties不生效
|
1 2 3 4 5 6 7 |
public class Main { public static void main(String[] args){ ApplicationContext applicationContext = new AnnotationConfigApplicationContext(FirstXml.class); PropertyDemo demo = (PropertyDemo) applicationContext.getBean("propertyDemo"); System.out.println(commonDemo.score()); } } |
由于@ConfigurationProperties属性是spring boot包才有的,所以必须启动spring boot之后才会生效。则可以通过在如下Controller中使用,然后启动spring boot来测试
|
1 2 3 4 5 6 7 8 9 10 11 12 13 14 15 |
@Controller public class HelloController { @Autowired private PropertyDemo propertyDemo; @RequestMapping("/helloJson") @ResponseBody public ResponseDemo helloJson(){ ResponseDemo demo = new ResponseDemo(); demo.setMessage(propertyDemo.getScore()); demo.setResultCode("000"); return demo; } |
3 Maven环境配置
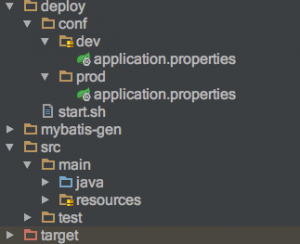
1、新增配置文件
如下一个项目的目录,在deploy目录下保存dev和prod两套环境,这里配置文件名称使用application.properties,这样springboot默认可以自动加载这个配置文件。
2、在pom.xml文件中进行配置
|
1 2 3 4 5 6 7 8 9 10 11 12 13 14 15 16 17 18 19 20 21 22 23 24 25 26 27 28 29 30 31 32 33 34 35 36 37 |
<profiles> <!---指定dev和prod两套环境--> <profile> <id>dev</id> <properties> <deploy.type>dev</deploy.type> </properties> </profile> <profile> <id>prod</id> <properties> <deploy.type>prod</deploy.type> </properties> <activation> <activeByDefault>true</activeByDefault> </activation> </profile> </profiles> <build> <!---SpringBoot应用 的打包插件---> <plugins> <plugin> <groupId>org.springframework.boot</groupId> <artifactId>spring-boot-maven-plugin</artifactId> </plugin> </plugins> <resources> <resource> <directory>deploy/conf/${deploy.type}</directory> </resource> <resource> <directory>src/main/resources</directory> </resource> </resources> </build> |
需要注意:
- 在<resouce>中必须加上 <directory>src/main/resources</directory>
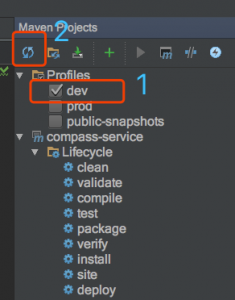
3、本地执行
(1)首先选择dev。然后执行刷新(一定要执行此刷新操作,否则dev不生效)
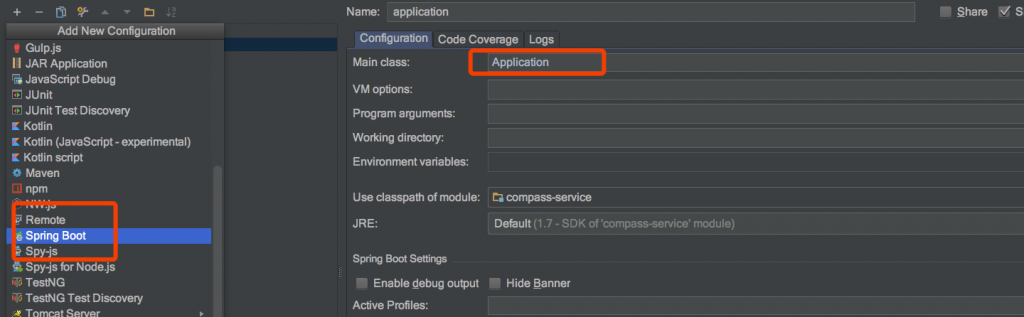
(2)添加一个spring boot应用并配置 入口main,如下。然后就可以启动啦
(全文完)

(翻译)")


