本文概览:介绍 Java NIO的通道Channel 、 缓冲区Buffer 和 Selectors。
1 JAVA NIO 介绍
Java nio是jdk1.4引入目的就是提升文件IO和网路IO的速度。主要包括三方面:
- 基于channel和buffer的NEW IO模型,这也是NIO名称来源,即New IO。通过NIO可以代替传统IO实现文件读/写。有两种方式读写文件,都是操作page cache:
- FileChannel和ByteBuffer
- MappedByteBuffer
- 多路复用。通过 selector组件实现。
- 零拷贝。FileChannel#mmap和FileChannel#transfer两种方式。
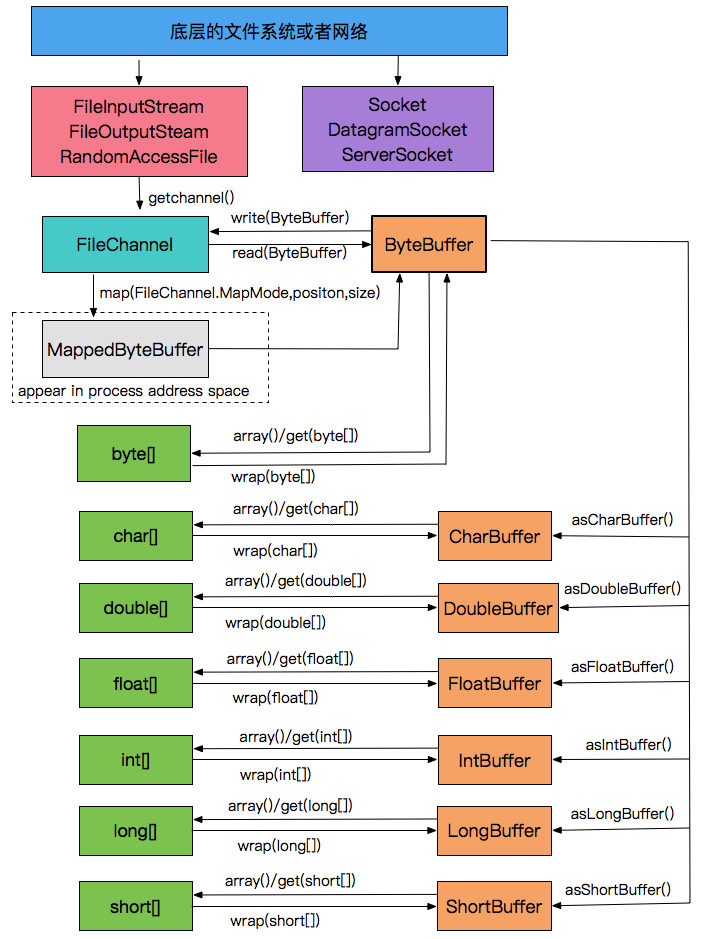
Java NIO主要包括 通道Channel 、 缓冲区Buffer 和 Selectors三部分。关系如下图:

Java NIO通过事件监听(Selector监听channle)实现单线程阻塞来代替之前的多线程阻塞。这种模型好处在于:
- 使用较少的线程就可以处理很多连接,减少了内存管理(每一个线程需要分配线程栈,线程越多需分配的内存越多)和上下文切换所带来的开销(线程过多时,线程上下文切换会变大)。
- 当没有I/O操作需要处理时,cup可以执行其他线程。
2 Java IO 与 NIO
java IO流程如下图

在引入NIO之后,面向buffer的编程,流程如下图

2 Channel
Channel是用于对磁盘文件的一种抽象(Linux“一切皆文件”的思想,已经把所有的资源系统抽象为文件,如硬件设备、网络通信接口等)。根据文件不同,包括如下Channel
- FileChannel,映射文件
- SocketChannel,映射Socket
- SocketServerChannel,映射ServerSocket
- DatagramChannel ,映射udp
2.1 FileChannel
1 获取FileChannel
为了引入NIO,原来IO来修改了FileInputStream(读)、FileOutputStream(写)、RandomAcceessFile(可读写)三个类,增加了getChannle()方法用于可以产生FileChanel。
|
1 2 3 |
String filePath = "/Users/wuzhonghu/Desktop/inputdata.txt"; RandomAccessFile accessFile = new RandomAccessFile(filePath, "rw"); FileChannel fileChannel = accessFile.getChannel(); |
2、其他方法
待完善
2.2 SocketChannel
1、获取
通过ServerSocketChannel来获取
|
1 |
SocketChannel c = serverSocketChannel.accept(); |
2、其他方法
待完善
2.3 ServerSocketChannel
1、获取
|
1 2 3 4 5 6 7 |
final ServerSocketChannel serverSocket; // 打开ServerSocketChannel serverSocket = ServerSocketChannel.open(); // 设置iP和端口 serverSocket.socket().bind( new InetSocketAddress(port)); // 设置成非阻塞形式 serverSocket.configureBlocking(false); |
2、监听连接
|
1 2 3 4 |
while(true){ SocketChannel socketChannel = serverSocketChannel.accept(); //do something with socketChannel... } |
2.4 DatagramChannel
1、待完善
3 Buffer
可以参考:https://howtodoinjava.com/java/nio/java-nio-2-0-working-with-buffers/#buffer_examples
我们与Channel的读写数据交互都是通过操作缓冲区Buffer来完成。所以NIO的操作对象是缓冲区,缓冲区的数据结构有ByteBuffer、CharBuffer、DoubleBuffer、IntBuffer、LongBuffer、ShortBuffer,其中只有ByteBuffer可以跟channel进行交互,其他buffer可以看出是ByteBuffer的视图。
以FileChannel(还有可能是SocketChannel或者ServerSocketChannel)和Buffer之间关系为例,如下:

每一个缓冲区Buffer结构如下:position和limit的含义取决于Buffer处在读模式还是写模式。不管Buffer处在什么模式,capacity的含义总是一样的。
- 容量capcity。永久不可变。
- 位置position。下一次进行读写的位置。
- 当你开始向 Buffer 写入数据时,你必须知道数据将要写入的位置。position 的初始值为 0。当一个字节或长整数等类似数据类型被写入 Buffer 后,position 就会指向下一个将要写入数据的位置(根据数据类型大小计算)。position 的最大值是 capacity – 1。
- 当你需要从 Buffer 读出数据时,你也需要知道将要从什么位置开始读数据。在你调用 flip 方法将 Buffer 从写模式转换为读模式时,position 被重新设置为 0。然后你从 position 指向的位置开始读取数据,接下来 position 指向下一个你要读取的位置。
- 界限limit。超过它进行读写是没有意义的
- 在写模式下,Buffer的limit表示你最多能往Buffer里写多少数据。 写模式下,limit等于Buffer的capacity。
- 当切换Buffer到读模式时, limit表示你最多能读到多少数据。因此,当切换Buffer到读模式时,limit会被设置成写模式下的position值(在position设置为0前的值,即当前写位置的值)。
- 标记mark。可以用于重复一个读入或者写出操作

对于这个四个索引位置,有类似GET/SET的方法,如下:
- capcity()。返回capcity的值,类似get方法。
- limit()。返回limit的值,类似get方法。
- limit(int)。设置limit的值,类似set方法。
- positision()。返回position的值,类似get方法。
- positinon(int)。设置position的值,类似set方法。
- mark()。设置mark的值为position的值。
- remaining()。返回(limit-position)。
- hasRemaing()。limit和positon之前是否存元素,如果存在返回true。
Buffer的读/写操作都是以position作为起始位置,limit作为最大位置,如下是对position和limit的特殊操作。
- clear()或compact()。从
Buffer中读取数据之后,必须让Buffer为再次写入做好准备。您可以通过调用clear()或调用compact()来做到这一点。-
clear(),position将被设置为0,并limit置为capacity。换句话说,Buffer被清除。如果缓冲区中有任何未读数据,则数据将被“遗忘” compact()将所有未读的数据复制到Buffer的开头。然后将position设置为最后一个未读元素之后的位置。与clear()一样,limit属性仍然设置为capacity。现在Buffer已经准备好写入,但是不会覆盖未读数据。
-
- flip:将Buffer从写模式切换到读模式,limit设置为position的值,然后将position设置为0。操作目的是为 读取已写入缓冲区的数据 。
- rewind:postion设置为0,limit保持不变。操作目的是为了 重新从缓存起始位置读取数据。
- reset:position设置为mark。操作目的,被标记的部分可以重新被读入或写出。
3.1 写
1、put方法
|
1 2 3 4 5 6 7 8 |
public void testWriteWithPut(){ // 初始化 IntBuffer intBuffer = IntBuffer.allocate(10); // 定义channel intBuffer.put(10); intBuffer.put(20); System.out.println(intBuffer); } |
2、通过channle操作
|
1 2 3 4 5 6 7 8 |
public void testWriteWithChannel() throws Exception{ String filePath = "/Users/wuzhonghu/Desktop/inputdata.txt"; RandomAccessFile accessFile = new RandomAccessFile(filePath, "rw"); FileChannel fileChannel = accessFile.getChannel(); ByteBuffer buffer = ByteBuffer.allocate(48); fileChannel.read(buffer); fileChannel.close(); } |
3.2 读取
1、get方法
|
1 2 3 4 5 6 7 8 9 |
public void testRead(){ // 初始化 IntBuffer intBuffer = IntBuffer.allocate(10); // 定义channel intBuffer.put(10); int value = intBuffer.get(0); System.out.println(value); } |
2、通过channel
|
1 2 3 4 5 6 7 8 |
public void testReadWithChannel() throws Exception{ String filePath = "/Users/wuzhonghu/Desktop/inputdata.txt"; RandomAccessFile accessFile = new RandomAccessFile(filePath, "rw"); FileChannel fileChannel = accessFile.getChannel(); ByteBuffer buffer = ByteBuffer.allocate(48); fileChannel.read(buffer); fileChannel.close(); } |
4 Selector
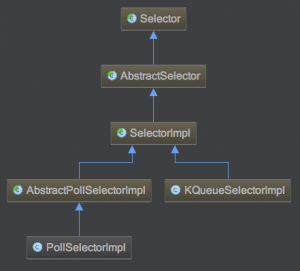
与Selector一起使用时,Channel必须处于非阻塞模式下。这意味着不能将FileChannel与Selector一起使用,因为FileChannel不能切换到非阻塞模式,而套接字通道都可以。Selector中支持的channel类型是SelChImpl,对应具体的类有:

目前具体的Selector有SelectorImpl、KQueueSelectorImpl和PollSelectorImpl。如下

4.1 创建Selector
|
1 |
Selector selector = Selector.open(); |
4.2 向selector注册通道
方法
|
1 2 |
channel.configureBlocking(false); SelectionKey key = channel.register(selector,Selectionkey.OP_READ); |
Selector监听Channel时对什么事件感兴趣。可以监听四种不同类型的事件:
- Connect
- Accept
- Read
- Write
这四种事件用SelectionKey的四个常量来表示:
- SelectionKey.OP_CONNECT
- SelectionKey.OP_ACCEPT
- SelectionKey.OP_READ
- SelectionKey.OP_WRITE
如果对不止一种事件感兴趣,那么可以用“位或”操作符将常量连接起来,如下:
|
1 |
int interestSet = SelectionKey.OP_READ | SelectionKey.OP_WRITE; |
4.3 select 方法
select可以理解成监听channel是否就绪,分为阻塞、非阻塞、阻塞某一段时间,返回值是准备好的通道个数:
|
1 2 3 4 5 6 7 8 |
// 阻塞到至少有一个通道在你注册的事件上就绪了 int select() // 和select()一样,除了最长会阻塞timeout毫秒(参数)。 int select(long timeout) // 不会阻塞,不管什么通道就绪都立刻返回 int selectNow() |
4.4 selectKeys() 方法
通过select知道有多少个通道准备就绪,然后通过selectKeys()返回准备好的selectKey的集合。
|
1 |
Set selectedKeys = selector.selectedKeys(); |
4.5 WakeUp()
某个线程调用select()方法后阻塞了,即使没有通道已经就绪,也有办法让其从select()方法返回。只要让其它线程在第一个线程调用select()方法的那个对象上调用Selector.wakeup()方法即可。阻塞在select()方法上的线程会立马返回
4.6 Close()
用完Selector后调用其close()方法会关闭该Selector,且使注册到该Selector上的所有SelectionKey实例无效。通道本身并不会关闭。
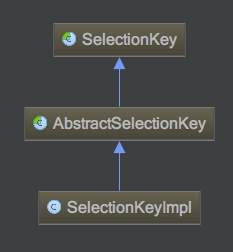
5 SelectKey
维护了事件状态以及保存了事件的处理器,通过attach添加事件处理器。

5.1 attach() 和 attachment()
|
1 2 3 4 5 6 7 |
// 1.attach方法 SelectionKey key = socketChannel.register(selector, SelectionKey.OP_READ); key.attach(new Processor()); // 2.attachment获取对象 Processor processor = (Processor) key.attachment(); |
6 Java NIO Read File
这里参考 https://howtodoinjava.com/java/nio/nio-read-file/
6.1 FileChannel and ByteBuffer to read small files
Java read small file using ByteBuffer and RandomAccessFile
|
1 2 3 4 5 6 7 8 9 10 11 12 13 14 15 16 17 18 19 20 21 22 23 24 25 26 27 28 29 30 31 32 33 34 35 36 37 38 |
package com.howtodoinjava.test.nio; import java.io.IOException; import java.io.RandomAccessFile; import java.nio.ByteBuffer; import java.nio.channels.FileChannel; public class ReadFileWithFileSizeBuffer { public static void main(String args[]) { try { RandomAccessFile aFile = new RandomAccessFile("test.txt","r"); FileChannel inChannel = aFile.getChannel(); long fileSize = inChannel.size(); ByteBuffer buffer = ByteBuffer.allocate((int) fileSize); inChannel.read(buffer); buffer.flip(); //Verify the file content for (int i = 0; i < fileSize; i++) { System.out.print((char) buffer.get()); } inChannel.close(); aFile.close(); } catch (IOException exc) { System.out.println(exc); System.exit(1); } } } |
6.2 FileChannel and ByteBuffer to read large files
Use this technique to read the large file where all the file content will not fit into the buffer at a time, the buffer size will be needed of some very big number. In this case, we can read the file in chunks with a fixed size small buffer.
|
1 2 3 4 5 6 7 8 9 10 11 12 13 14 15 16 17 18 19 20 21 22 23 24 25 26 27 28 29 30 |
package com.howtodoinjava.test.nio; import java.io.IOException; import java.io.RandomAccessFile; import java.nio.ByteBuffer; import java.nio.channels.FileChannel; public class ReadFileWithFixedSizeBuffer { public static void main(String[] args) throws IOException { RandomAccessFile aFile = new RandomAccessFile("test.txt", "r"); FileChannel inChannel = aFile.getChannel(); ByteBuffer buffer = ByteBuffer.allocate(1024); while(inChannel.read(buffer) > 0) { buffer.flip(); for (int i = 0; i < buffer.limit(); i++) { System.out.print((char) buffer.get()); } buffer.clear(); // do something with the data and clear/compact it. } inChannel.close(); aFile.close(); } } |
6.3 Read a file using MappedByteBuffer
|
1 2 3 4 5 6 7 8 9 10 11 12 13 14 15 16 17 18 19 20 21 22 23 24 25 26 |
package com.howtodoinjava.test.nio; import java.io.IOException; import java.io.RandomAccessFile; import java.nio.MappedByteBuffer; import java.nio.channels.FileChannel; public class ReadFileWithMappedByteBuffer { public static void main(String[] args) throws IOException { RandomAccessFile aFile = new RandomAccessFile("test.txt", "r"); FileChannel inChannel = aFile.getChannel(); MappedByteBuffer buffer = inChannel.map(FileChannel.MapMode.READ_ONLY, 0, inChannel.size()); buffer.load(); for (int i = 0; i < buffer.limit(); i++) { System.out.print((char) buffer.get()); } buffer.clear(); // do something with the data and clear/compact it. inChannel.close(); aFile.close(); } |
7 java nio与网路
7.1 使用JAVA nio 实现sokcet
如下 Reactor模式的实现
参考资料
1、java IO 系列
英文版:http://tutorials.jenkov.com/java-nio/index.html
中文版:http://ifeve.com/overview/
2、《java编程思想》 第18.10节
3、《java核心技术》卷II 第1.7节
4、Java Standard IO vs New IO https://howtodoinjava.com/java/io/difference-between-io-nio/


