目录
本文概览:介绍了Reactor设计模式,并介绍NIO的对于Reactor简单实现,以及三种常见实现方式。
1 Reactor模式
1.1 介绍
1、模式目的
|
1 2 3 |
wikipedia:https://en.wikipedia.org/wiki/Reactor_pattern “反应器设计模式(Reactor pattern)是一种事件驱动模式,使用这种事件驱动模式来处理用户的并发请求。服务器可以解复用这些请求并分发这些请求至相关的请求处理程序。” |
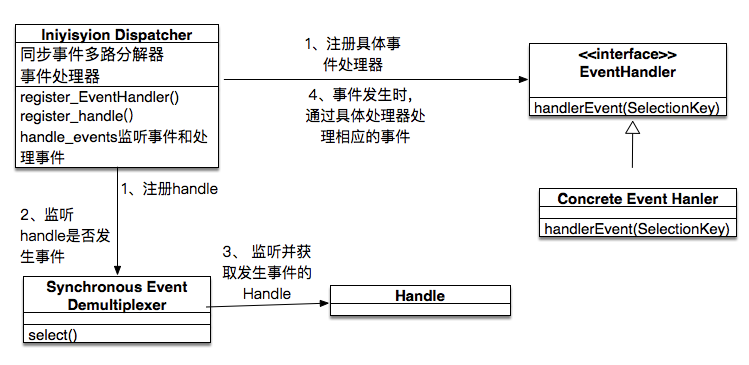
由上wiki中内容,可以把Reactor反应堆模式理解成一种事件驱动设计模式,这个设计模式的作用是为了处理并发的请求时,避免为每个需要处理的请求创建一个线程。如下图中Event Loop实现了解复用和分发请求两个功能。

2、组件介绍
- Handles:标识操作系统一种资源,如文件、socket。类比java nio中SelectKey或者Channel。
- 同步事件多路分解器Synchronous Event EDemultiplexer。阻塞所有的Handle,直到感兴趣的事件出现。类比java nio Selector,可以通过select()方法实现监听channel。
- 分发器Initiation Dispatcher。通过调用同步事多路分解器的监听方法,发现有感兴趣事件就通知相应的事件处理器处理请求。
- 事件处理器EventHandler,定义了一个接口,表示事件发生时的操作逻辑。
- 具体事件处理器Concrete event handler。事件发生时具体的操作逻辑
1.2 JAVA NIO一个Reactor实例
|
1 2 3 4 |
可以参考 “Understanding Reactor Pattern with Java NIO”: http://kasunpanorama.blogspot.com/2015/04/understanding-reactor-pattern-with-java.html 其中,对应的代码地址为: https://github.com/kasun04/rnd/tree/master/nio-reactor |
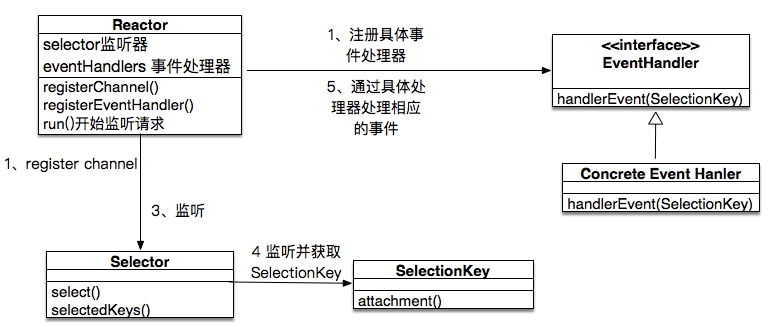
类的关系图如下
1、Reactor代码
Reactor作用:
(1)初始化
- 注册一个Channle到selector
- 加载事件处理器EventHandler
(2)通过select监听满足事件的SelectKey
(3)根据事件类型,使用相应的事件处理器EventHandler来处理SelectKey
Reactor具体的代码如下:
|
1 2 3 4 5 6 7 8 9 10 11 12 13 14 15 16 17 18 19 20 21 22 23 24 25 26 27 28 29 30 31 32 33 34 35 36 37 38 39 40 41 42 43 44 45 46 47 48 49 50 51 52 53 54 55 56 57 58 59 60 61 62 63 64 65 66 67 68 |
public class Reactor { private Map<Integer, EventHandler> registeredHandlers = new ConcurrentHashMap<Integer, EventHandler>(); private Selector demultiplexer; public Reactor() throws Exception { demultiplexer = Selector.open(); } public Selector getDemultiplexer() { return demultiplexer; } public void registerEventHandler( int eventType, EventHandler eventHandler) { registeredHandlers.put(eventType, eventHandler); } public void registerChannel( int eventType, SelectableChannel channel) throws Exception { channel.register(demultiplexer, eventType); } public void run() { try { while (true) { // Loop indefinitely // 1、阻塞监听 demultiplexer.select(); // 2、获取满足监听事件的selectKey。 Set<SelectionKey> readyHandles = demultiplexer.selectedKeys(); Iterator<SelectionKey> handleIterator = readyHandles.iterator(); // 3.根据不同事件类型进行处理 while (handleIterator.hasNext()) { SelectionKey handle = handleIterator.next(); // 3.1通过OP_ACCEPT事件处理器处理Channel if (handle.isAcceptable()) { EventHandler handler = registeredHandlers.get(SelectionKey.OP_ACCEPT); handler.handleEvent(handle); } // 3.2通过OP_READ事件处理器处理Channel if (handle.isReadable()) { EventHandler handler = registeredHandlers.get(SelectionKey.OP_READ); handler.handleEvent(handle); handleIterator.remove(); } // 3.3通过OP_WRITE事件处理器处理Channel if (handle.isWritable()) { EventHandler handler = registeredHandlers.get(SelectionKey.OP_WRITE); handler.handleEvent(handle); handleIterator.remove(); } } } } catch (Exception e) { e.printStackTrace(); } } } |
2、定义一个EventHandler
|
1 2 3 4 |
public interface EventHandler { public void handleEvent(SelectionKey handle) throws Exception; } |
(1)定义一个AcceptEventHandler
|
1 2 3 4 5 6 7 8 9 10 11 12 13 14 15 16 17 18 19 20 21 22 23 24 |
public class AcceptEventHandler implements EventHandler{ private Selector demultiplexer; public AcceptEventHandler(Selector demultiplexer) { this.demultiplexer = demultiplexer; } public void handleEvent(SelectionKey handle) throws Exception { System.out.println("===== Accept Event Handler ====="); ServerSocketChannel serverSocketChannel = (ServerSocketChannel) handle.channel(); // Selector负责监听ServerSocketChannel的OP_ACCEPT事件,当有新的连接时: // 创建SocketChannel与客户端进行通信,并注册OP_READ事件。 SocketChannel socketChannel = serverSocketChannel.accept(); if (socketChannel != null) { socketChannel.configureBlocking(false); // channel注册到selector,监听的事件类型为OP_READ socketChannel.register( demultiplexer, SelectionKey.OP_READ); } } } |
(2)ReadEventHandler,处理读事件
|
1 2 3 4 5 6 7 8 9 10 11 12 13 14 15 16 17 18 19 20 21 22 23 24 25 26 27 28 29 30 31 32 33 34 35 36 |
public class ReadEventHandler implements EventHandler { private Selector demultiplexer; private ByteBuffer inputBuffer = ByteBuffer.allocate(2048); public ReadEventHandler(Selector demultiplexer) { this.demultiplexer = demultiplexer; } public void handleEvent(SelectionKey handle) throws Exception { System.out.println("===== Read Event Handler ====="); SocketChannel socketChannel = (SocketChannel) handle.channel(); socketChannel.read(inputBuffer); // Read data from client inputBuffer.flip(); // Rewind the buffer to start reading from the beginning byte[] buffer = new byte[inputBuffer.limit()]; inputBuffer.get(buffer); System.out.println("Received message from client : " + new String(buffer)); inputBuffer.flip(); // Rewind the buffer to start reading from the beginning // Register the interest for writable readiness event for // this channel in order to echo back the message // 注册当前channel到selector,监听类型为OP_WRITE socketChannel.register( demultiplexer, SelectionKey.OP_WRITE, inputBuffer); } } |
(3)WriteEventHandler,处理读事件
|
1 2 3 4 5 6 7 8 9 10 11 12 |
public class WriteEventHandler implements EventHandler { public void handleEvent(SelectionKey handle) throws Exception { System.out.println("===== Write Event Handler ====="); SocketChannel socketChannel = (SocketChannel) handle.channel(); //ByteBuffer bb = ByteBuffer.wrap("Hello Client!\n".getBytes()); ByteBuffer inputBuffer = (ByteBuffer) handle.attachment(); socketChannel.write(inputBuffer); socketChannel.close(); } } |
3、入口
|
1 2 3 4 5 6 7 8 9 10 11 12 13 14 15 16 17 18 19 20 21 22 23 24 25 26 27 28 29 30 31 32 33 34 35 36 37 38 39 40 41 42 |
public class ReactorManager { private static final int SERVER_PORT = 7070; public void startReactor(int port) throws Exception { ServerSocketChannel server = ServerSocketChannel.open(); server.socket().bind(new InetSocketAddress(port)); server.configureBlocking(false); Reactor reactor = new Reactor(); // 1.注册SocketServerChannel。channel注册到selector,监听的事件类型为OP_ACCEPT reactor.registerChannel(SelectionKey.OP_ACCEPT, server); // 2.加载事件处理器 // 2.1加载OP_ACCEPT事件处理器:此事件发生时的处理SelectKey的业务逻辑 reactor.registerEventHandler( SelectionKey.OP_ACCEPT, new AcceptEventHandler( reactor.getDemultiplexer())); // 2.2加载OP_READ事件处理器:此事件发生时的处理SelectKey的业务逻辑 reactor.registerEventHandler( SelectionKey.OP_READ, new ReadEventHandler( reactor.getDemultiplexer())); // 2.3加载OP_WRITE事件处理器:此事件发生时的处理SelectKey的业务逻辑 reactor.registerEventHandler( SelectionKey.OP_WRITE, new WriteEventHandler()); // 3.启动reactor reactor.run(); // Run the dispatcher loop } public static void main(String[] args) { System.out.println("Server Started at port : " + SERVER_PORT); try { new ReactorManager().startReactor(SERVER_PORT); } catch (Exception e) { e.printStackTrace(); } } } |
4、测试,启动main之后,执行http://localhost:7070,在终端日志显示如下信息。
|
1 2 3 4 5 6 7 8 9 10 11 12 13 14 15 16 17 18 19 20 21 |
Server Started at port : 7070 ===== Accept Event Handler ===== ===== Accept Event Handler ===== ===== Read Event Handler ===== Received message from client : GET / HTTP/1.1 Host: localhost:7070 Connection: keep-alive Cache-Control: max-age=0 Upgrade-Insecure-Requests: 1 User-Agent: Mozilla/5.0 (Macintosh; Intel Mac OS X 10_11_5) AppleWebKit/537.36 (KHTML, like Gecko) Chrome/84.0.4147.105 Safari/537.36 Accept: text/html,application/xhtml+xml,application/xml;q=0.9,image/webp,image/apng,*/*;q=0.8,application/signed-exchange;v=b3;q=0.9 Sec-Fetch-Site: cross-site Sec-Fetch-Mode: navigate Sec-Fetch-Dest: document Accept-Encoding: gzip, deflate, br Accept-Language: zh-CN,zh;q=0.9,en;q=0.8 Cookie: Hm_lvt_18f18be6e58f13d87192835c8c15fdca=1595244981 ===== Accept Event Handler ===== ===== Write Event Handler ===== |
2 Java NIO 的reactor几种常用模式
|
1 |
参考:http://gee.cs.oswego.edu/dl/cpjslides/nio.pdf |
也可以通过 :https://pan.baidu.com/s/1oWywgY724bFL7I3za3kkOQ 提取码: j9ur
2.1 背景
以socket请求为例。假设一个请求处理包括read、decode、compute、encode、send五个操作,如下图是传统处理请求的模式:为每一个请求分配一个线程。
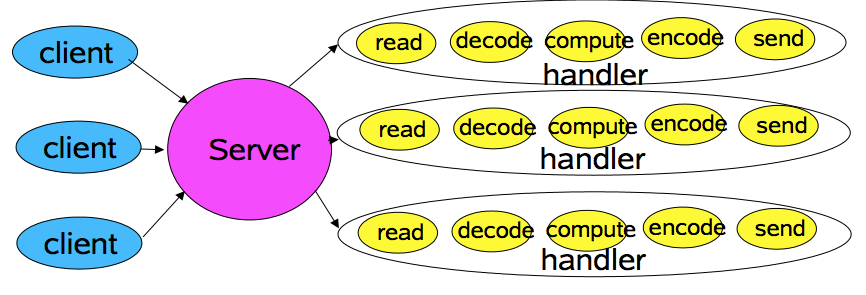
上图对应具体代码如下:
|
1 2 3 4 5 6 7 8 9 10 11 12 13 14 15 16 17 18 19 20 21 22 23 24 25 26 |
class Server implements Runnable { public void run() { try { ServerSocket ss = new ServerSocket(PORT); while (!Thread.interrupted()) new Thread(new Handler(ss.accept())).start(); // or, single-threaded, or a thread pool } catch (IOException ex) { /* ... */ } } static class Handler implements Runnable { final Socket socket; Handler(Socket s) { socket = s; } public void run() { try { byte[] input = new byte[MAX_INPUT]; socket.getInputStream().read(input); byte[] output = process(input); socket.getOutputStream().write(output); } catch (IOException ex) { /* ... */ } } private byte[] process(byte[] cmd) { /* ... */ } } } |
在上面模式中,存在问题有:
- 可能存在大量线程处于休眠状态,只是在等待输入或者输出数据就绪,这可能算是一种资源浪费。
- 对于每一个线程需要分配栈内存,存在大量线程会造成内存占有过多。
- 线程个数多时,上下文切换带来的开销也比较大。
为了解决上面问题,提供高系统并发能力,通过基于Java NIO事件驱动的Reactor模式来实现,好处在于:
- 使用较少的线程就可以处理很多连接,减少了内存管理(线程需要分配线程栈)和线程上下文切换所带来的开销。
- 当没有I/O操作需要处理时,cup可以执行其他线程。
具体Reactor分为三种:
- Basic Reactor Dessign,将原来一个请求一个线程模式改变为事件监听模式,即一个线程监听多个请求。
- Worker Thread Pools,将处理请求中非IO操作放置线程池处理
- Using Multiple Reactors,定义多个Reactor,相当于单机部署多个app,提高CPU和IO利用率。
2.2 Basic Reactor Design
通过一个线程进行监听请求,当监听到事件之后,进行处理请求
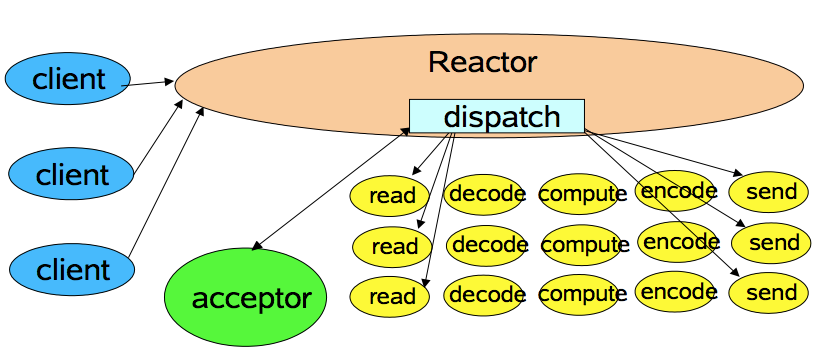
1、定义Reactor
|
1 2 3 4 5 6 7 8 9 10 11 12 13 14 15 16 17 18 19 20 21 22 23 24 25 26 27 28 29 30 31 32 33 34 35 36 37 38 39 40 41 42 43 44 45 46 47 48 49 50 |
public class Reactor implements Runnable{ final Selector selector; final ServerSocketChannel serverSocket; Reactor(int port) throws IOException { selector = Selector.open(); serverSocket = ServerSocketChannel.open(); serverSocket.socket().bind( new InetSocketAddress(port)); serverSocket.configureBlocking(false); SelectionKey sk = serverSocket.register(selector, SelectionKey.OP_ACCEPT); // 在selectKey上增加处理器 sk.attach(new Acceptor()); } // normally in a new Thread public void run() { try { while (!Thread.interrupted()) { selector.select(); Set selected = selector.selectedKeys(); Iterator it = selected.iterator(); while (it.hasNext()) dispatch((SelectionKey)(it.next()); selected.clear(); } } catch (IOException ex) { /* ... */ } } void dispatch(SelectionKey k) { Runnable r = (Runnable)(k.attachment()); if (r != null) r.run(); } // 处理监听accept事件 class Acceptor implements Runnable { // inner public void run() { try { SocketChannel c = serverSocket.accept(); if (c != null) new Handler(selector, c); } catch(IOException ex) { /* ... */ } } } } |
2、定义SocketChannel的Handler
- 处理读事件
- 处理写事件
|
1 2 3 4 5 6 7 8 9 10 11 12 13 14 15 16 17 18 19 20 21 22 23 24 25 26 27 28 29 30 31 32 33 34 35 36 37 38 39 40 41 42 43 44 |
public class Handler implements Runnable{ final SocketChannel socket; final SelectionKey sk; ByteBuffer input = ByteBuffer.allocate(MAXIN); ByteBuffer output = ByteBuffer.allocate(MAXOUT); static final int READING = 0, SENDING = 1; int state = READING; Handler(Selector sel, SocketChannel c) throws IOException { socket = c; c.configureBlocking(false); // Optionally try first read now sk = socket.register(sel, 0); // 在selectKey上增加处理器 sk.attach(this); sk.interestOps(SelectionKey.OP_READ); sel.wakeup(); } boolean inputIsComplete() { /* ... */ } boolean outputIsComplete() { /* ... */ } // 处理数据的逻辑 void process(){ /* ... */ } public void run() { try { if (state == READING) read(); else if (state == SENDING) send(); } catch (IOException ex) { /* ... */ } } void read() throws IOException { socket.read(input); if (inputIsComplete()) { process(); state = SENDING; // Normally also do first write now sk.interestOps(SelectionKey.OP_WRITE); } } void send() throws IOException { socket.write(output); if (outputIsComplete()) sk.cancel(); } } |
2.3 Worker Thread Pools
在“3.1 Basic Reactor Design”中是单线程处理所有触发事件channel,即单线程调用所有处理逻辑,相应的Reactor代码如下
|
1 2 3 4 5 6 7 8 9 10 11 12 13 14 15 16 17 18 19 |
public void run() { try { while (!Thread.interrupted()) { selector.select(); Set selected = selector.selectedKeys(); Iterator it = selected.iterator(); // 单线程模式。主线程处理 满足条件channel 的 处理器逻辑 while (it.hasNext()) dispatch((SelectionKey)(it.next()); selected.clear(); } } catch (IOException ex) { /* ... */ } } void dispatch(SelectionKey k) { Runnable r = (Runnable)(k.attachment()); if (r != null) r.run(); } |
“Worker Thread Pools模式”是面向多核CPU的。目前的CPU都是多核了,所以都是可以支持该模式的。此模式的主要思想:把一个请求处理中非IO操作的逻辑放置到线程池处理,这也是与“ 3.1 Basic Reactor Design”的区别,
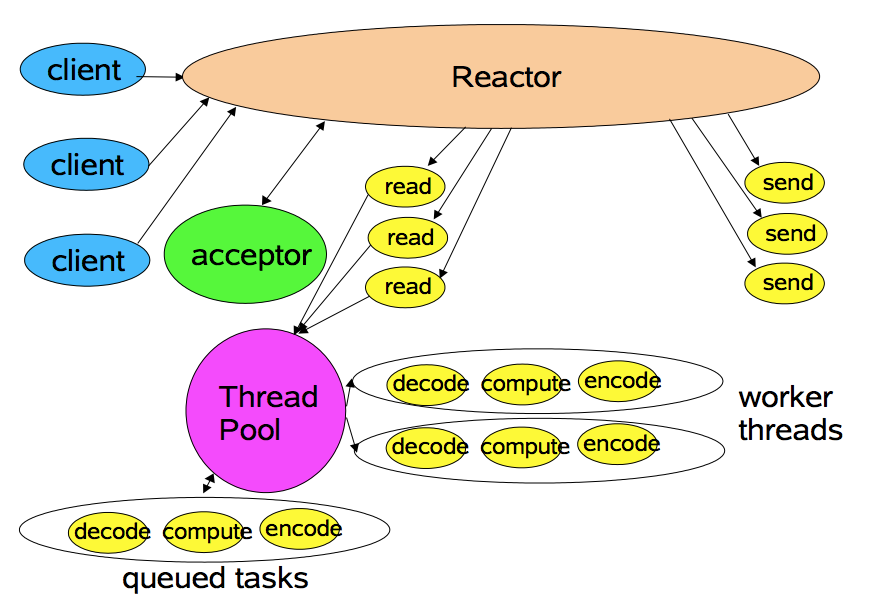
对应代码如下:
|
1 2 3 4 5 6 7 8 9 10 11 12 13 14 15 16 17 18 19 20 21 22 23 |
public class Handler { // uses util.concurrent thread pool static ThreadPoolExecutor pool = new ThreadPoolExecutor(...); static final int PROCESSING = 3; // ... synchronized void read() { socket.read(input); if (inputIsComplete()) { state = PROCESSING; pool.execute(new Processer()); } } synchronized void processAndHandOff() { process(); state = SENDING; // or rebind attachment sk.interest(SelectionKey.OP_WRITE); } // 1.将之前process()转成多线程处理 class Processer implements Runnable { public void run() { processAndHandOff(); } } } |
2.4 Using Multiple Reactors
使用多个Reactor线程,可以将IO负载均衡到不同Reactor。与2.3节中“Worker Thread Pools”相比,这里每一个sub Reactor都可以看成是2.3节中“Worker Thread Pools”中一个Reactor。
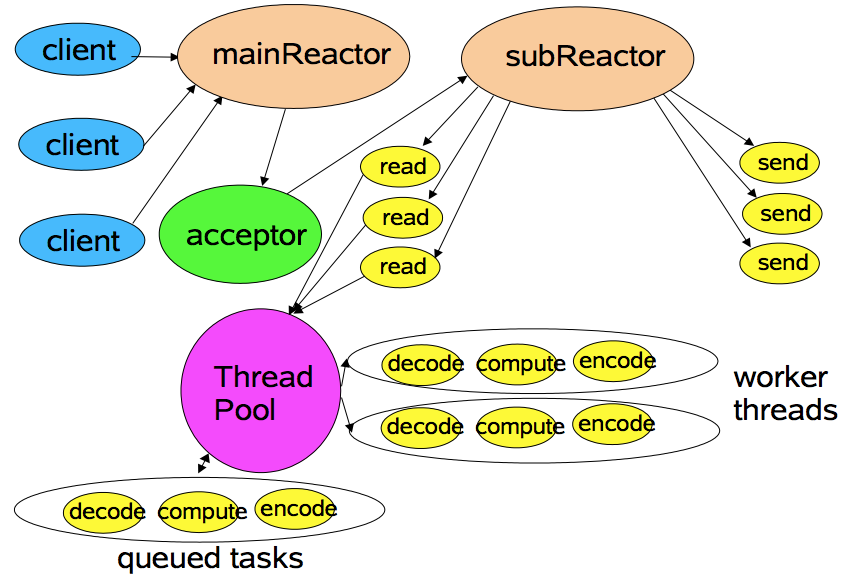
对应代码如下
|
1 2 3 4 5 6 7 8 9 10 11 |
Selector[] selectors; // also create threads int next = 0; class Acceptor { // ... public synchronized void run() { ... Socket connection = serverSocket.accept(); // 把请求均衡的分配到不同的selector if (connection != null) new Handler(selectors[next], connection); if (++next == selectors.length) next = 0; } } |
参考资料
1、Reactor An Object Behavioral Pattern for Demultiplexing and Dispatching Handles for Synchronous Events:http://www.dre.vanderbilt.edu/~schmidt/PDF/reactor-siemens.pdf
注意: 这篇文章是 Reacor模式的诞生的论文。
2、Scalable IO in Java :http://gee.cs.oswego.edu/dl/cpjslides/nio.pdf
3、Understanding Reactor Pattern with Java NIO
http://kasunpanorama.blogspot.com/2015/04/understanding-reactor-pattern-with-java.html
对应的代码地址:https://github.com/kasun04/rnd/tree/master/nio-reactor


