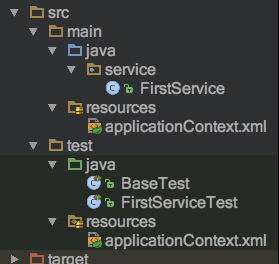
本文概览:介绍了一个IOC实例的应用,包括pom和xml的配置;以及介绍了两种加载上下文的方法。
1 IOC的介绍
1、IOC目的
就是初始化bean,载入到一个上下文中。将这个上下文供我们使用。
2 、ICO配置
Ioc就是定义一个xml,来定义bean。如
- 通过<bean>直接定义一个bean
- 通过scan来扫描注解
1<context:component-scan base-package="service" /> - 通过命名空间方式来自动生成0beanDefinition,并初始化bean对象,放置到上下文中。如<mvc:annotation-drive>、<tx:annotation-driven>来加载初始化bean。
3、使用IOC配置来初始话上下文
(1)直接初始化上下文,如engine实现。
|
1 |
ApplicationContext context = new ClassPathXmlApplicationContext(MAIN_LOCATION); |
(2)@ContextConfiguration
|
1 2 3 4 5 |
@ContextConfiguration("classpath:applicationContext.xml") @RunWith(SpringJUnit4ClassRunner.class) public class BaseTest { } |
(3)通过listener自动加载
如mvc的配置,通过listerner来自动加载上下文。
2 实例
2.1 配置

1、pom.xml
|
1 2 3 4 5 |
<properties> <junit.version>4.8.2</junit.version> <hamcrest.version>1.3</hamcrest.version> <org.springframework.version>3.2.3.RELEASE</org.springframework.version> </properties> |
(1)IOC需要的
|
1 2 3 4 5 6 7 8 9 10 11 12 13 14 15 |
<dependency> <groupId>org.springframework</groupId> <artifactId>spring-beans</artifactId> <version>${org.springframework.version}</version> </dependency> <dependency> <groupId>org.springframework</groupId> <artifactId>spring-context</artifactId> <version>${org.springframework.version}</version> </dependency> <dependency> <groupId>org.springframework</groupId> <artifactId>spring-core</artifactId> <version>${org.springframework.version}</version> </dependency> |
(2)测试需要
|
1 2 3 4 5 6 7 8 9 10 11 12 13 14 15 16 17 18 19 20 21 |
<!--配置 Spring测试 beg--> <dependency> <artifactId>spring-test</artifactId> <groupId>org.springframework</groupId> <version>${org.springframework.version}</version> <scope>test</scope> </dependency> <!--配置 Spring测试 end--> <!--配置 单元测试 beg--> <dependency> <groupId>junit</groupId> <artifactId>junit</artifactId> <version>${junit.version}</version> <scope>test</scope> </dependency> <dependency> <groupId>org.hamcrest</groupId> <artifactId>hamcrest-all</artifactId> <version>${hamcrest.version}</version> </dependency> <!--配置 单元测试 end--> |
2、定义bean
|
1 2 3 4 5 6 7 8 9 10 11 |
@Service public class LearnBeanNameAware implements BeanNameAware { String beanName; @Override public void setBeanName(String name) { this.beanName = name; } public String getBeanName() { return beanName; } } |
3、在resource下配置applicationContext.xml
|
1 2 3 4 5 6 7 8 9 10 |
<?xml version="1.0" encoding="UTF-8"?> <beans xmlns:xsi="http://www.w3.org/2001/XMLSchema-instance" xmlns:context="http://www.springframework.org/schema/context" xmlns="http://www.springframework.org/schema/beans" xsi:schemaLocation="http://www.springframework.org/schema/beans http://www.springframework.org/schema/beans/spring-beans-3.0.xsd http://www.springframework.org/schema/context http://www.springframework.org/schema/context/spring-context.xsd"> <context:component-scan base-package="com.companyname.workgroup.apply.module.service" /> </beans> |
- 总结1 <context:component-scan>引入多个包时,都采用如下方式,不是是用逗号隔开
|
1 2 |
<context:component-scan base-package="com.qunar.des.scm.crm.biz"/> <context:component-scan base-package="com.qunar.des.scm.crm.service"/> |
- 总结2 引入文件<import resource=”xxx/xx.xml”>,如果要引入多个xml,则
|
1 2 |
<import resource="classpath:/spring/engine-dependency.xml"/> <import resource="classpath:/spring/engine-util.xml"/> |
4. github地址
https://github.com/zhonghuwu/iocTemplate
2.2 使用上下文
2.2.1 方式1 单元测试
|
1 2 3 4 |
@ContextConfiguration("classpath:applicationContext.xml") @RunWith(SpringJUnit4ClassRunner.class) public abstract class BaseTest { } |
测试类如下
|
1 2 3 4 5 6 7 8 |
public class LearnBeanNameAwareTest extends BaseTest{ @Resource private LearnBeanNameAware learnBeanNameAware; @Test public void test(){ System.out.println("bean对象的名字"+learnBeanNameAware.getBeanName()); } } |
执行结果
bean对象的名字learnBeanNameAware
2.2.2 方式2 直接手动初始化上下文
在engine中ApplicationRunner#run就是通过这种方式来实现
|
1 2 3 4 5 6 |
public class Test { public static void main(String[] args) { ClassPathXmlApplicationContext context = new ClassPathXmlApplicationContext("applicationContext.xml"); ExampleBean exapmleBean = (ExampleBean)context.getBean("exampleBean"); } } |
2.2.3 方式3 自动加载方式
在配置mvc需要配置一个listener来自动加载上下文
|
1 2 3 4 5 6 7 8 9 |
<!--自动加载spring 容器 beg--> <context-param> <param-name>contextConfigLocation</param-name> <param-value>classpath:applicationContext.xml</param-value> </context-param> <listener> <listener-class>org.springframework.web.context.ContextLoaderListener</listener-class> </listener> <!--自动加载spring 容器 end--> |
(全文完)


